Calling ROS Services & Actions
The Bridge Client node autodetects all available ROS Services and Actions on all discovered nodes, and the Web UI then provides various tools to call them with custom data payloads and receive replies. Service and action calls can be even mapped to keyboard keys, gamepad and touch UI buttons.
ROS action calls use the same UI and API as ROS services, both are internally implemented as service calls. The main difference between a service and an action is that action receives two replies: one when the goal is set (or refused), another one when the goal is reached or cancelled. Multiplle calls of a particular service are queued and executed sequentially, while a repeated invocation of an action in the UI cancels its previously set goal.
Note
The services API provides a reliable way of calling ROS services and actions, however, it is not designed with speed nor low latency in mind. All service requests are queued and processed in sequential order by the Bridge Client node which also waits for every service reply. If no reply arrives withing 20s (default), you will receive a timeout error. If you need to call a service several times per second, you should probably use topic messages instead.
Services and actions can be blacklisted or collapsed in the menu, the default timeout can be adjusted in the phntm_bridge.yaml config file:
 /**:
   ros__parameters:

     blacklist_services: [] # blacklist services and actions from discovery (msg types or full service ids)
     collapse_unhandled_services: True # the UI will collapse services with unsupported message types
     collapse_services: # list of service IDs and/or types to be collapsed in the UI
       - rcl_interfaces/srv/DescribeParameters
       - rcl_interfaces/srv/GetParameterTypes
       - type_description_interfaces/srv/GetTypeDescription
     default_service_timeout_sec: 20.0 # default timeout for service replies
In order to be able to call any ROS service or action, the Bridge Client node needs to have access to its type definitions. See Custom message & Service types for more info.
The most basic service types (e.g. std_srvs/srv/Empty, std_srvs/srv/Trigger or std_srvs/srv/SetBool) come with pre-defined user interface out of the box to make calling them as simple as clicking a button. For services or actions that take more complex input data, we first need to define the payload.
Configuring Payload Buttons
In the Services dropdown menu, you will see the { } symbol next to each service/action name, clicking it opens the payload editor. The editor allows to define custom data to call the service with, and to save such calls as UI buttons. All defined buttons are displayed next to the service/action name in the dropdown menu.
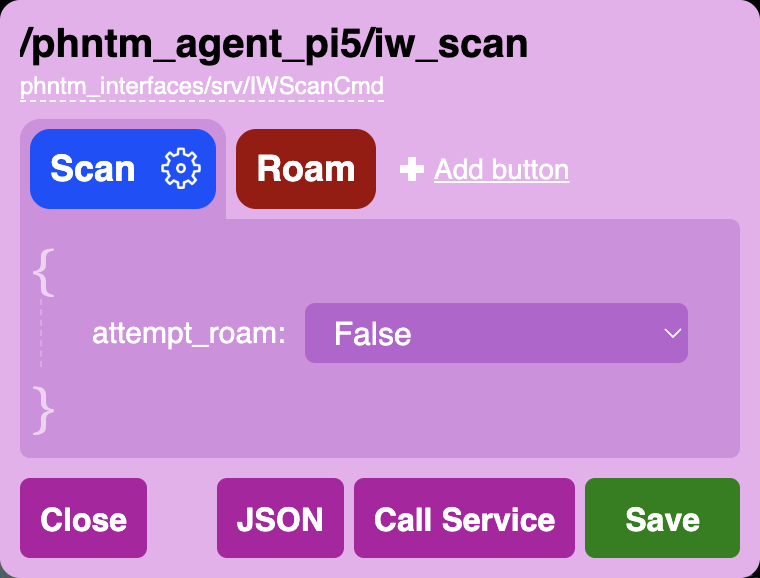
The example on the right shows a very basic input structure, the data can get much more complex. The editor uses autodetected message type to provide as much guidance and input validation as possible. You can also test-call the service/action at any moment to check that your input produces desires outcome. Payload can be copied and pasted as JSON, you can also refer to a payload button from the Input Manager.
Similarly to the input mapping configuration, when you click Save in the button payload editor, all configured buttons and asociated data will be stored only locally in your web browser. To make this setup available as the default configuration to other users and devices, you need to export these definitions as a JSON and store them in a config file on the ROS machine.
You’ll need to make this JSON file available to the Bridge Client’s Docker container:
 services:
   phntm_bridge:

     volumes:
       - ~/service_defaults.json:/ros2_ws/service_defaults.json # mount your JSON defaults into the container
And you also need to tell the Bridge to use it with the service_defaults parameter inside your phntm_bridge.yaml config file:
 /**:
   ros__parameters:

     service_defaults: /ros2_ws/service_defaults.json # path to config file as mapped inside the container
Restart the client / container and reload the Web UI. These payload button definitions will be used as the defaults for all devices and users accessing the robot’s Bridge Web UI. At any point, these defaults can be overridden by the user’s own local configuration, which always takes priority.
Note
Modified payload buttons are always saved and applied to the current web browser only. Changes need to be saved to your robot’s JSON defaults file in order to be applied to other peers or devices. Deleting the configuration in a web browser will reset it to the robot’s defaults on the next page load.
The JSON defaults file has the following structure:
 {
     "/node/service_id": [ // full service or action ID
         {
             "id": "ad9b746f-228c-4c7f-8fc2-62b08ecdc6b6" // internal id of the button
             "label": "Button label",
             "color": "red",
             "silent_request": true, // disables UI request notifications
             "silent_reply": false, // disables UI reply notificatinos
             "value": { } // custom payload
         }
     ],
     "/other_node/other_service_id": [
         {
             "id": "135eaa0f-80e6-4e4b-8a1d-605d08b2f158"
             "label": "Button 1 label",
             "color": "orange",
             "silent_request": true,
             "silent_reply": true,
             "value": { } // custom payload
         },
         {
             "id": "62176c6b-993e-4316-8f1e-3efa4229b764"
             "label": "Button 2 label",
             "color": "magenta",
             "silent_request": true,
             "silent_reply": false,
             "value": { } // custom payload
         }
     ]
 }
Implementing Custom Widgets
In addition to calling services with pre-configured payloads as described above, you can also create a completely unique controls for any ROS service.
To do that, you need to extend the ServiceInputBase class and create a custom service widget that will be displayed in the service dropdown menu in a similar fashion to the standard buttons. A custom widget is responsible for rendering of its own DOM elements, and can be initialized by a value provided by a getter ROS service.
An example of such a widget - a slider menu element - can be found in the Bridge UI Extras repo and also in the live demos.

To register your custom service widget, include it in the UI using the ui_custom_includes_js parameter.
You can then map it to a service as shown below, plus any custom parameters to be passed to the widget.
The extra params defined for the service can be read using this.client.getServiceConfig(id_service) in your extended class.
Timeouts for each service call can be customized in this.client.serviceCall().
 /**:
   ros__parameters:

     ui_custom_includes_js:
       - https://www.some-server.com/custom-service-widget.js

     # custom service menu widget mapping
     /some_node/some_service:
       menu_widget: CustomServiceWidget # widget class to use, must be included via ui_custom_includes_js
       custom_widget_param_1: 0.5 # custom attributes for the widget class follow
       custom_widget_param_2: 'This is a string param'
       custom_widget_param_3: False
       custom_widget_getter_service: /some_node/some_other_service
See Customizing the User Interface for more details on how to host the extension files and ServiceInputBase for API reference.