User Input & Teleoperation
The Web UI offers a comprehensive Input Manager that can map various forms of user input (keyboard, gamepad, touchscreen) into messages produced into ROS topics, and even ROS service calls. Any ROS machine can be teleoperated both over the local network or remotely over the Internet, often without any need for re-configuration.
Out of the box, Phantom Bridge offers two built-in input drivers: Twist
and Joy. These will generate
geometry_msgs/msg/Twist, geometry_msgs/msg/TwistStamped and sensor_msgs/msg/Joy control messages. Creating a custom input driver
to generate any other message type is a fairly simple process, see more below.
ROS service call with a custom payload can be also easily mapped to a keyboard key or gamepad button, offering a wide range of possible interaction with a ROS
machine. You can even start, stop or restart a Docker container with a single press of a button utilizing the docker_command service published by Agent nodes.
Input Profiles
Input configurations are organized into Profiles. The idea is that rather than having all possible actions configured as many keys or shortcuts at all times, a profile can be selected for a certain situation with a simple key press.
For example, when a mobile robot is equipped with a dedicated backup camera and a manipulator arm, you can switch to a Reversing profile when backing up (which changes your steering and forward directions and perhaps even alters speed), or to a Manipulating profile (when controlling the arm while the rest of the robot remains stationary).
Several different input drivers can be active at the same time for each individual input device, allowing to combine for instance keyboard and gamepad controls into one complex input scheme.
Configuration Process
When you first install the Bridge Client on your machine, there’s no input configuration.
In your phntm_bridge.yaml config file, you will find a parameter allowing which input drivers are enabled in the UI.
Both Joy and Twist are enabled by default, but in general only be the drivers the robot can understand should be enabled.
 /**:
   ros__parameters:

     input_drivers: [ 'TwistInputDriver', 'JoyInputDriver' ]
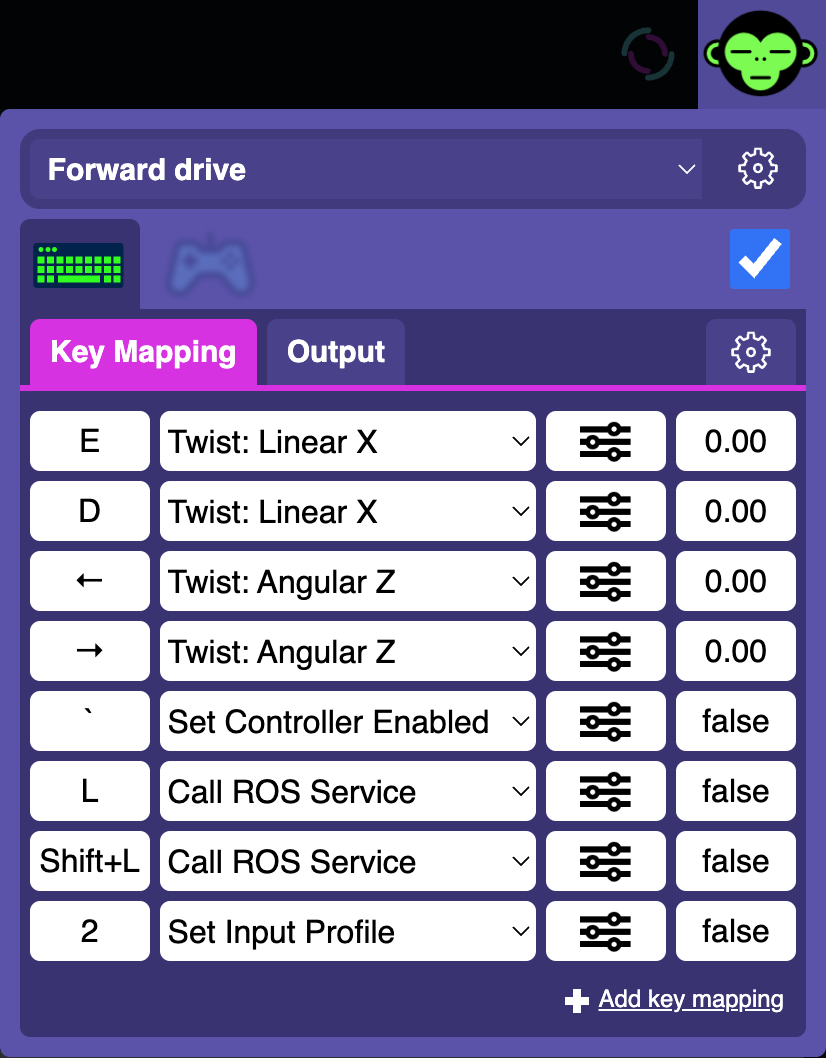
Open the Input Manager in the Web UI (the monkey icon in top right) and configure your mapping for any connected controllers. ROS messages will be generated into specified topics when the controller is active and enabled, and transmitted to your machine over the fast UDP WebRTC data channels. When the user input stops, the Input Manager keeps transmitting for a few more seconds to ensure the machine actually receives the stop command.

When happy with the configuration, click the Save Profile button to store it locally in your web browser. Your input settings will be loaded every time you load the Web UI.
In order to make your input setup available to all users interacting with your robot, you need to export it as JSON and save to your robot. Here you need to make sure the JSON file is available inside the Bride Client’s Docker container:
 services:
   phntm_bridge:

     volumes:
       - ~/input_defaults.json:/ros2_ws/input_defaults.json # mount your JSON defaults into the container
And you also need to tell the Bridge to use it with the input_defaults parameter inside your phntm_bridge.yaml file:
 /**:
   ros__parameters:

     input_drivers: [ 'TwistInputDriver', 'JoyInputDriver' ] # enabled input drivers
     input_defaults: /ros2_ws/input_defaults.json # path to input config JSON file inside the container
Restart the client / container and reload the Web UI. This setup will be used as the defaults for all devices and users accessing the robot’s Bridge Web UI. At any point, these defaults can be overridden by the user’s own local configuration, which always takes priority.
Note
Configuration changes are always saved and applied to the current browser only. Changes need to be saved to your robot’s JSON defaults in order to be applied to other peers or devices. Deleting the configuration/profile in a web browser will reset it to the robot’s defaults on the next page load.
The JSON defaults file has the following structure:
 {
     "ProfileID": {
         "label": "My Input Profile",
         "keyboard": {
             "driver": "DriverClassName",
             "driver_config": { },
             "buttons": [ ]
         },
         "gamepad": {
             "driver": "DriverClassName",
             "driver_config": { },
             "axes": [ ],
             "buttons": [ ],
         },
         "default": true
     }
     "OtherProfileID": {
         // ...
     }
 }
Profile names and IDs can be customized in the Input Manager. When exporting all profiles as JSON, the currently active profile will be marked as default.
Gamepads
Gamepads often slightly vary in their button and axis naming convensions, so creating one configuration that works with all of them
uniformly might be a bit challening. On export, the full vendor ID of the connected gamepad is used such as “DualSense Wireless Controller
(STANDARD GAMEPAD Vendor: 054c Product: 0ce6)”. When used in the defaults JSON, only gamepads with the identical vendor ID will be
matched. If you want to create a fallback configuration for all gamepads, replace this vendor ID with the "gamepad" keyword,
or simply add this fallback on top of a configuration for the known vendor IDs. The users can always adjust their own setup based of the
defaults.
Custom Touchscreen Buttons
On touchscreen devices, the interface can be extended by defining extra custom buttons that will be placed in the top or bottom part of the screen. These can be configured like any other keyboard or gamepad buttons and will be accompanied by a virtual gamepad, useful for controlling up to 4 custom output axes. You can change the display order of these buttons by dragging them around, and even use emojis as icons to save on valuable screen space.

Implementing Custom Drivers
On top of the built-in Twist and Joy input drivers, you can also easily create a custom driver that maps user’s input into any message type you need.
The main role of an input driver is to create named Axes and Buttons the users can map their input to. Then it simply generates messages of the desired type based on the state of these Axes and Buttons.
To create a custom driver, extend the InputDriverBase class. In order to enable your custom input driver, it needs
to be added to input_drivers as shown below, and the source file must be included into the UI via ui_custom_includes_js:
 /**:
   ros__parameters:

     input_drivers: [ 'TwistInputDriver', 'MyCustomDriverClass' ] # MyCustomDriverClass is the name of custom driver's class
     ui_custom_includes_js:
       - https://www.some-server.com/custom-input-driver.js
Note that the message type your driver will be generating must be available to the Bridge Client node on the ROS machine.
See Custom Message Types for details.
You can examine our example driver which simply outputs true on any user input as std_msgs/msg/Bool messages. This driver is available live in our demos (switch to the Bool Test profile in the Input Manager).
See Customizing the User Interface for more details on how to host the extension JS files and InputDriverBase for API reference.